Using Screen Controls

Contents
The following example shows how to write a script to perform screen control based automation. The same Windows calculator script presented in the previous example (Using JIA for Standard Applications) is used, but in this case the automation is based on screen controls.
To automate the operation 1 + 1 = 2:
1.Create a new JIA project (Starting a New JIA Project).
2.Access the Repository file:
From the View menu, select Solution Explorer.

Then, double-click Repository.xml.
An empty Repository appears as follows:
<?xml version="1.0"?> <Repository Name="JIAProjectName" xmlns="jacada.com/Fusion/Repository">
</Repository> |
3.Capture a standard Calculator window, and define it in the Repository. For details, refer to Using JIA for Standard Applications, Steps 3 & 4.
4.Open the Screen Capture Tool by running the ScreenControlsCaptureTool batch file. The path to the file is:
<JIA Installation> ScreenControls\ScreenControlsCaptureTool.bat
5.Capture the ![]() button of the Calculator, save the image, and copy its screen control definition to the Repository:
button of the Calculator, save the image, and copy its screen control definition to the Repository:
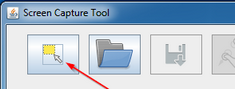
a. From the toolbar of the Screen Capture Tool, click the Capture Image icon.
The Screen Capture Tool is hidden, and a message on the screen prompts you to select a region to capture.

b. Position the mouse pointer at a corner of the 1 button of the Calculator. Click the left mouse button, and then drag the mouse over the entire 1 button area.
Then, release the mouse.
An image of the 1 button appears in the Captured Image frame.
c. Validate the captured image:
From the toolbar of the Screen Capture Tool, click the Validate icon.

When the image is found on the desktop, a red border appears around it, and a confirmation message is then displayed in the Screen Capture Tool.

d. Save the captured image to the disk:
From the toolbar of the Screen Capture Tool, click ![]() .
.
From the Save dialog, navigate to the relevant folder, specify a name for the image, and click Save.
The image is saved, and its screen control definition (Repository entry) is displayed in the Repository Object frame of the Screen Capture Tool.
e. Copy the Repository entry in the Repository Object frame, and paste it into the Repository.xml file as a child of the previously defined Calculator window.
6.Capture the ![]() and
and ![]() buttons of the Calculator, using the procedure described in Step 5.
buttons of the Calculator, using the procedure described in Step 5.
7.Capture the textbox of the Calculator. The textbox should be captured as a region defined by its offset from a specific image:
a. Using the Capture Image icon, capture the button row below the textbox. (Refer to Step 5, actions a-b.)
![]()
This image will be used as a reference for the textbox.
b. From the toolbar of the Screen Capture Tool, click the Expanded Region icon.

On the desktop, the captured button row is labeled and highlighted.
c. Position the mouse pointer at a corner of the Calculator textbox, and then drag the mouse over the entire textbox. Then, release the mouse button.
The dimensions of the region are displayed on the desktop.

d. Save the region by pressing S.
e. Save the image to the disk. Then copy the Repository entry to the Repository as a child of the main Calculator window.
(For more details, refer to Step 5, actions d-e.)
Your Repository should now appear as follows:
<Window Name="Calculator" ProgId="Calc"> <ScreenControl ProgId="BtnOne" ImgIdentifierPath="C:\Users\ezfira\Desktop\BtnOne.png" ImageMatchingLevel="90"/> <ScreenControl ProgId="BtnPlus" ImgIdentifierPath="C:\Users\ezfira\Desktop\BtnPlus.png" ImageMatchingLevel="90"/> <ScreenControl ProgId="BtnEq" ImgIdentifierPath="C:\Users\ezfira\Desktop\BtnEq.png" ImageMatchingLevel="90"/> <ScreenControl ProgId="LblResult" ImgIdentifierPath="C:\Users\ezfira\Desktop\LblResult.png" ImageMatchingLevel="90" HorizontalOffsetFromIdInPixels="1" HorizontalOffestDirection="right" VerticalOffsetFromIdInPixels="41" VerticalOffestDirection="up" ExpandedRegionHeight="37" ExpandedRegionWidth= "182" /> </Window> |
8.In the HelloWorld service call add the following code:
Calc calc = FindWindow<Calc>();
calc.BtnOne.LeftClick(1); calc.BtnPlus.LeftClick(1); calc.BtnOne.LeftClick(1); calc.BtnEq.LeftClick(1);
return calc.LblResult.CopyTextUsingClipboard(1); |
This code performs the following sequence of actions:
a. Click the 1 button.
b. Click the + button.
c. Click the 1 button again.
d. Click the = button.
e. Copy the text from the result, using the clipboard.
9.Run the program and call the service. The returned result should be 2.