Adding Interaction Variables
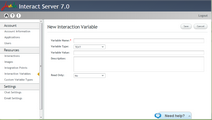
The Add button opens the New Interaction Variable page, which enables you to create a new system or Read Only variable. The following rules apply to creating new interaction variables:
•The variable name may not be identical to that of an existing system or Read Only variable.
•The variable name may not be identical to that of a system or Read Only variable that is in use in the latest version of an existing Interaction. If a variable with the same name was used in a previous version of an Interaction, a warning popup appears when you create the new interaction variable.
1.At the upper right corner of the Interaction Variables page, click Add. The New Interaction Variable page opens. 2.In the Variable Name textbox, enter a relevant name for the variable. This parameter must be defined. 3.From the Variable Type dropdown list, select the appropriate type. The default type is Text. 4.Configure the default value for the variable. The input field provided varies according to the variable type selected: •Text, Number, Currency: A textbox is presented. •Boolean: A checkbox is presented. •Date: A textbox with a date picker is presented. Use the date picker to navigate to and select a date. Alternatively, enter the date in the textbox. The supported date format is DD/MM/YYYY. 5.In the Description field, enter notes or comments related to the variable. 6.From the Read Only dropdown list, select the desired status of the new variable: •Yes: The variable will be Read Only. (The user is not able to update the default value.) •No: The variable will not be Read Only. (The user is able to update the default value.) This is the default status. 7.If the variable is Read Only, in the Client Header textbox, enter a name to be passed at the start of the Interaction to populate the variable. 8.Click Save. A confirmation message is displayed, and the new variable is displayed in the Interaction Variables list. |

