Setting Up the Authentication Link
Jacada Interaction Server provides the ability to authenticate and authorize users using an existing access control infrastructure. The Interaction server can integrate with existing security mechanisms and access control management systems, such as Active Directory (LDAP). Authentication and authorization is done using a username / password, a verification process, and an access token exchange.
Note: For more information about authentication options in Jacada Interaction Server, refer to the Jacada Interaction Server Administration Guide. |
Integration with an existing infrastructure requires setup of a server hosting an Authentication Link. The Authentication Link is a dedicated application that serves as a gateway between the Interaction server and your local access control system (e.g., Active Directory or LDAP server). The application receives authentication and authorization requests directly from Jacada Interaction Server clients, and passes them to the LDAP or Active Directory server for verification. User credentials are never exposed to the Interaction server.
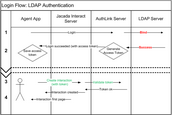
The server access authentication flow involves 4 phases, which are presented in the following diagram.
To deploy the AuthLink configuration to your environment:
1.Copy the authentication.properties file to a location on the AuthLink machine (e.g., place it under C:\authlink\authentication.properties). The authentication.properties file is under authlink-resources, provided with the AuthLink distribution package.
2.Create an environment variable called AUTHLINK_HOME. Point this variable to the location of the properties file. For example, AUTHLINK_HOME = C:\authlink.
3.Configure the settings in the authentication.properties file to match your LDAP environment. For detailed information about the authentication.properties file, refer to the Jacada Interaction Server Administration Guide (Configuring AuthLink Authentication).
4.Deploy the authlink.war file on Tomcat.

