Creating a REST Integration Point
In this phase, we will create a REST integration point that sends a request for contact ID, and returns a customer object.
Integration points are created and updated in the Jacada Interaction Server Admin Console. Access the Login page of the Admin Console using the following URL:
https://<SERVER_URL>/admin/login/<COMPANY_ID>. Then, log in by entering your username (email) and password.
Note: COMPANY_ID is the alias you entered when you created your account. |
1.From the menu bar on the left side of the Admin Console (under Resources), select Integration Points. The Web Service Integration Points page opens. If any integration points have already been defined, they are listed in the grid. 2.At the upper right corner of the page, click Add, and then select REST. The New Rest Integration Point page opens. 3.In the REST Url field, enter https://interact.jacada.com/mockcrm/contacts/[contactID].
4.At the upper right corner of the page, click Next until the Response tab is displayed. The expected response from this request type is a custom object containing information about a customer. We will therefore create a new custom variable type to hold the response. 5.From the Variable Type dropdown list, select New custom type. Then, click Create.
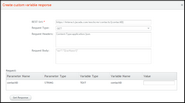
The Create Custom Variable Response popup opens. This window allows you to connect to the service and receive its structure. 6.At the bottom of the window, in the Value field, enter 1. Then, click Get Response. A list of all available fields is displayed. 7.Click the Remove link in each row to delete all fields except for the following ones: •phone_home •id •first_name •last_name 8.In the Name for new custom type textbox, enter my_customer. Then, click Create. The Create Custom Variable Response popup closes. 9.In the Response tab, in the Variable Name field, enter a friendly name for the new variable. This will be the name displayed in the Interaction Designer.
Then, click Next. 10.In the Definition tab, enter a name and description for the new integration point. Then, click Create. 11.To test the integration point, click Test to access the Test Integration Point page. In the Request frame, enter a value, and then click Test. Test results are displayed in the Response frame. 12.To exit the new integration point wizard, click Done. 13.To make the integration point visible to others, change its status from Draft to Approved: a. At the left side of the Web Service Integration Points page, select the checkbox in the row of the new integration point. Then, at the top of the page, click Approve. b. In the popup window, click Yes. A confirmation message is displayed, and the integration point is approved. |


