Jacada Advisor: Workflow
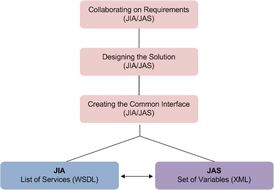
Creating a Jacada Advisor project is a collaborative effort between the JAS business designer and the JIA developer. The project workflow is outlined in the following diagram.

In this phase, the JAS designer and the JIA developer agree on project requirements, and design the solution. They decide together which parts of the project will be implemented in JIA, and which parts will be implemented in JAS. Following these decisions, the designer and developer can create the common interface for the project, which comprises: •The services implemented by JIA and invoked by JAS: The JIA developer provides the JAS designer with a WSDL file containing the JIA exposed methods (Invoke JIA Automation). The JAS Designer loads this file to the Designer project in order to invoke specific JIA services. •A set of variables to be used when loading the Interaction: The JAS designer gives the JIA developer a file (variables_config.xml) containing a key-value list for all the read-only variables (Advisor variables) used in the Interaction. The JIA developer uses the content of this file as input parameters to the Interaction that is loaded into the Guidance Popup. •The Interaction Friendly Name and the Interaction Space Name: These parameters, which identify an Interaction, are used by the JIA developer in the JIA project to load a specific Interaction into the Guidance Popup. |
In the first part of this phase, the JIA developer and JAS designer work separately on their own parts of the project: •JAS Designer: The designer creates the Interaction, incorporating all required variables and using JIA-related elements (Show Guidance and Invoke Automation) as necessary. For more information, refer to Executing JAS Commands. •JIA Developer: The developer performs the following actions: oCreates the required automation: The developer implements automation of all the services that were targeted to be included in the WSDL. oIntegrates the content of the variables_config.xml to the JIA project: The developer copies the content of the variables_config.xml file into the JASModel.xml file. When this file is saved, automatic code generation creates the JASModel class. Using this class, the developer is able to set a value for every input parameter needed for the interaction. (The JASModel class contains a property for each key in the variables_config.xml file.) For more details, refer to Creating the JASModel Class. oLoads the Interaction: Using the JASService APIs, the developer loads the Interaction to the guidance popup. (In this stage, the developer uses the Interaction FriendlyName and Interaction SpaceName agreed to in the design stage, as well as the JASModel class instance). If necessary, the developer can control the display settings and visibility of the popup, using the JASService APIs. When the separate parts of the project are ready, they are integrated and the project is tested. Based on testing results, the project is modified and retested. |
Phase 3: Deploying the Project
The final version of the project is released.


