Adding Accounts
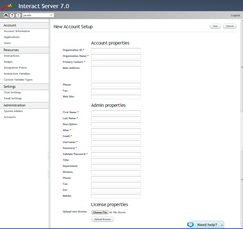
The New Account button opens the New Account Setup page, which enables System Administrators to create a new account.
1.At the upper right corner of the Accounts page, click New Account. The New Account Setup page opens. 2.In the Account properties section, define the settings that will be displayed on the Account Information page. The following settings are mandatory: •Organization ID: A unique identifier for the account. This identifier is appended to the URL used to access the Admin Console, e.g., <server:port>/admin/login/jacada. •Organization Name: The name of the company with which the account is associated. •Primary Contact: Name and/or other details (e.g., email address) related to the user who will manage the account. 3.If desired, enter relevant details in the remaining fields (Main Address, Phone, Fax, and Web Site). 3.In the Admin properties section, define the settings for a default administrative user who will be able to manage the new account. The following settings are mandatory: •First name: The administrator's given name. •Last name: The administrator's family name. •Description: Notes or comments related to the administrator. This parameter is optional. •Alias: A friendly name by which the administrator is known. •Email: The email address to which system notifications will be sent. 4.In the Username textbox, enter the credential to be used for accessing the Admin Console. The username does not have to be unique. It may be in email format, but it need not be the user's actual email address. 5.In the Password textbox, enter the credential to be used for accessing the Admin Console. Then, re-enter the password in the Validate Password textbox. 6.If desired, enter relevant details in the remaining fields (Title, Department, Division, Phone, Fax, Ext., and Mobile). 7.If desired, in the License properties section, define a license file for the new account: a. Click Choose File. From the popup window, navigate to and select the relevant license file, and then click Open. b. Click Upload License.
8.At the upper right corner of the page, click Save. Account details are saved, and the new account is displayed on the Accounts page. |

