The Agent Application channel type features 2 settings tabs:
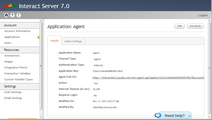
•Details tab: Displays settings related to authentication.
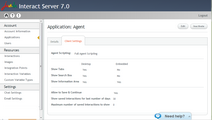
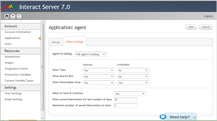
•Client Settings tab: Displays settings related to the presentation and layout of the application in the browser.
Clicking the Application Name link in the grid on the Applications page displays the Details tab by default.
The following example shows the settings displayed on the Details tab.

The settings are listed and described in the following table.
Setting
|
Description/Notes
|
Authentication Type
|
•Internal: Authentication is based on an internal database controlled through the Admin Console. •Custom: Authentication is based on an external authorization server that operates according to Jacada Interact's security specification. For more information, refer to Authentication Overview.
|
Application Key
|
An identifier that is defined in the Jacada Interact Admin Console and used for access to the server. The application key is generated automatically when an application is added.
|
Agent-App Full URL
|
The full URL path used to access the application. The application key must be appended to the URL.
|
Active
|
Indicates whether the application is currently active. The application key of an inactive application is disabled, and users are unable to access Interactions.
|
Internal Timeout
|
The period of time (in seconds) during which the client can send requests without the need for revalidation of the access token by the authorization server.
|
Authentication Link URL
|
The full URL path to the relevant AuthLink server. This setting appears only when Custom authentication type is selected.
Clicking Test tests the connection to the server.
|
Requires Login
|
This setting determines whether or not users need to log in to access unsecured Interactions.
|
|
This tab displays settings that define the default presentation, layout, and functionality of the Agent Application. The settings that are available vary according to whether the Agent Scripting parameter is set to Full Agent Scripting (agents can start Interactions) or Interaction History Only (agents can access previously run Interactions). In both modes, separate settings can be configured for the standalone (desktop) application and the embedded application (widget option).
The following example shows the settings displayed on the Client Settings tab (Full Agent Scripting mode).

The settings are listed and described in the following table. For a detailed explanation of the options and features of the Agent Application, refer to the Agent Application Guide.
Setting
|
Description
|
Default Value (Desktop)
|
Default Value (Embedded)
|
Relevant to Full Agent Scripting Mode Only
|
Show Tabs
|
Determines whether Interactions are opened in new tabs.
|
Yes
|
Yes
|
No
|
Show Search Box
|
Determines whether the search tool is shown or hidden.
|
Yes
|
No
|
No
|
Show Information Area
|
Determines whether the area showing data relevant to the customer or the system is shown or hidden.
|
Yes
|
No
|
Yes
|
Allow to Save & Continue
|
Determines whether an agent may save a partially finished Interaction.
|
No
|
Yes
|
Show saved interactions for last number of days
|
Determines the content of the Use Saved frame of the application. For example, if the value is set at 2, all Interactions that were saved within the last 2 days are listed in the Use Saved frame.
|
30
|
Yes
|
Maximum number of saved interactions to show
|
Determines the maximum number of saved Interactions to retrieve. For example, if this value is set to 50, and there are 200 saved Interactions, only the first 50 will be listed in the Use Saved frame.
|
100
|
Yes
|
|
1.From the Applications page, in the row of the relevant Agent Application, click the Application Name link. The Application Details page opens, with the Details tab displayed by default.
2.At the right upper corner of the page, click Edit. The fields become editable.
3.Update settings of the Details tab, as required. If you select the Custom authentication type, verify that you have entered an Authentication Link URL. Clicking Test tests the connection to the server.
4.Update settings of the Client Settings tab, as required. Keep in mind that additional settings are displayed when Full Agent Scripting is selected. 
5.At the right upper corner of the page, click Save. A confirmation message is displayed, and the Applications page is displayed. Changes are saved in the system.
|


